I have been learning and developing react-native apps for quite some time now. Considering many people may not have much idea what react-native is and also people who have just started with this journey, I have tried to keep this post as simple and self-explanatory as possible.
I wanted to build an app that may interact with an external third party API (In our project it will be Zomato's API). I got help from Steven Grider's course for react-native building this app. But as many would know that he used yelp API for building his app, in India, we don't have yelp. Ya, that's sad, but it is true.😥
So, moving on I did some research about which platform's API I could use for my problem statement. Going through documentation of many websites I found Zomato's API to be ideal for my use-case.
Going through the following you would know how exactly this can be achieved.
- First, we will have to create this project using expo-cli. Make sure you have node Js installed, and expo-cli installed globally beforehand. Go through https://expo.io/learn for knowing the steps for setting up the environment. Alternatively, you can also go for react-native CLI too, but for simplicity's sake, I will choose to go for expo for my app. Open CMD (command prompt) or terminal, browse through the directory you want to create your project and run command-
- You would get the prompt like the following ,just hit on the blank option. This will install dependencies and finish setting up the project, so it may take some time.
- The initial set up folder structure you would get will be like-
- You would see that this will create a folder containing files like package.json, app.js, .gitignore, and folders like node_modules, @expo. I would also suggest setting up git at this point in time. It's not required, but its the best practice to maintain the projects with some sought of version control mechanism, and what's better than git itself. If you need anything about git, you could go to https://git-scm.com/book/en/v2 for reference. To start a git repo, run this command in git bash-
- To test that everything is rightly set up, run command expo start in the terminal.
- This would open up a tab in your default browser. Now, this QR code can be used to launch the application on the phone(both android and ios).
- go to Play Store (Android) or App Store(ios), download, and install the application expo.
- run the application and you will get a scan the QR code option on the top. Hit the tab and you can then scan the bar code that opened in the browser with the scanner.

- Now, let's get started with the coding. Its been a while hasn't it.😂😎
- The first thing I will do is create a src folder under the root directory. The src folder will contain two sub folder's namely - screens folder and components folder. The screen folder will contain all the code which will be individual screens. The components folder would contain all the individual bits and pieces in the app.
- The first screen to be created in the screen directory will be searchScreen.js which will contain the code for the homepage of the app. We will get ready with the boilerplate code which will look like the following.
- We will have to think of navigation too so as to switch between the screen, for this, I would use react-navigation. use the following code to install react-navigation and related dependencies.
- we will make use of this navigation in the App.js file by the code as shown in the screenshot below.
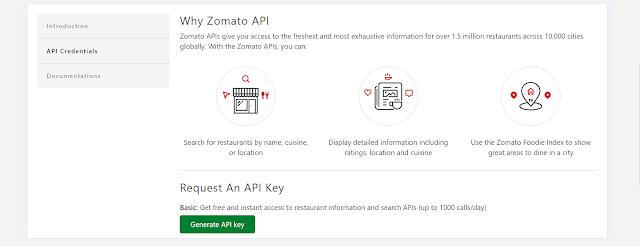
- Let us take a look at the zomato API documentation which we will make us for building our app. For this, you can go to the link - https://developers.zomato.com/api. Browse through this link and go to API credentials. There you can find generate the API key. You will have to create an account by clicking on that.After creating an account you will get an API key which will be used for making the call for service.
- As written in the documentation, you can call for zomato's API service 1000 times a day, which is quite a lot for our little dummy project 👦.
- You can also make use of the fetch for making the call for the API service. fetch is in-built to React-native. I will choose to install another library Axios to making the API related calls. To install Axios by running the following command.
- To use the API key,we will make a new folder under src named API .In this folder let's create a new file zomato.js . This will contain the base URL and key for making the API request. Following screenshot will make it clear.
- You will have to insert the key obtained in the 'user-key' property. I have intentionally written the wrong API key in this screenshot. Haha, so get you your own API key as it is free.
- The above step was the key step of all and this would mean most of the job is done. My advice would be to go through the documentation regarding different queries we could make by the API.
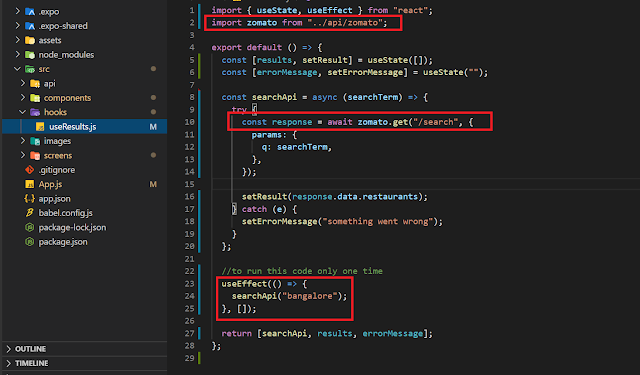
- To use this API, we will make a folder named hooks under src folder. I added a new file - useResults.js in this folder which will send the request and receive the response.
- You can see in the see in the above screenshot, I have made use "/search" in the query and in the parameter I have used q as param with this query. Now lets see what it does in the official zomato API docs.
- We passed q as the params. This is required for searching for everything with the term passed. So it comes in very handy.
- Now, let us make a search bar on top of the screen which will take the user's input. For this, we will make three component files named IndividualSearch.js, SearchBar.js, and SearchList.js. Though you can name it with whatever name you want but make sure it starts with an uppercase letter.
- I have written following code in the searchScreen.js .As this is the starting point this calls various components which may or may not be nested. I will be sharing the final(though basic styling and features) in the below section.
 |
| Search Screen code snippet |
- The search screen calls the component SearchBar for displaying the search bar on the top of the screen where we can pass the text input to make the search.
 |
| SearchBar code |
 |
| styling SearchBar.js |
- searchScreen calls the SearchList component. This is like a horizontally scrollable list where the results according to the criteria will be stored.
 |
| code and styling for SearchList component |
- SearchList will call the IndividualSearch component which will individually call the elements returned by making the query and styling it.
 |
| IndividualScreen component |
 |
| IndividualScreen component styling |
- While going through the official API documentation, I noticed that not all the searches will contain images. But, this will create a problem as there might be empty space for the restaurant which doesn't have images. So to solve this issue I added a default image to my project by creating a new dummy_image folder and having one default image under it. this will be called whenever there is no image for the restaurant. I have put this conditional check in the individual screen component. It is done as shown in the following screenshot-
 |
| conditional rendering |
- With this the app (the basic features) is complete. Lets test by running the command expo start in the terminal and scanning the QR code by the expo app on the phone as discussed in the starting section of this post. Let's see how it looks like.
- Above is the video showing the usage of the app.hope you like it.😄


That's informative 👍🏻
ReplyDeleteThanks a lot
Deletenice.. :) 👍
ReplyDeleteThank you Bhavesh.
DeleteGreat !! Organized the content well 👍
ReplyDeleteIt was really nice and informative.
ReplyDelete(y)