Creating react-native project to generating its APK (from scratch).
 |
| Photo by William Hook on Unsplash |
Creating react-native projects apps are fun, aren't they? Personally, I choose to go for using expo-cli for building projects as it is quite easy to use. We also get a choice of creating projects using react-native cli. Now, you would be wondering what's the difference, when should i choose one over other. Well, long story short you can go for either but the expo-cli projects are used for learning purpose and react-native cli projects are for the production purpose. When you create projects using the expo-cli, many features come pre-configured. You will just need to consume it. Whereas, in the react-native-cli projects you will need to individually configure and set up most of the features.
Anyways, the above is just the gist of how can you choose the project type. I will discuss this in detail, in some other post. In this post, I will be using an expo-cli project and later on show you how to generate APK (Android Package Kit).
The first step is to create the project. Open the terminal or cmd (in case of windows) and change your directory to the appropriate location where you want to create the project. Type the following command and press enter.
 |
| command to generate project |
It is important to know that the last term in the above command is actually the name of the folder and by default the app name also. So you can go can enter whatever name you want for the app. Also, you have the option of changing the name later. After running this command you will get a console menu option of what type of project you want to choose. For simplicity's sake, choose the first option which is named blank as shown below.
| choose blank |
Various dependencies will be installed and this may take 2-3 minutes, you will need to be patient here 😀. Following which a folder with the name MyApp will be generated. Go inside the folder following will be the folder structure that you will get.
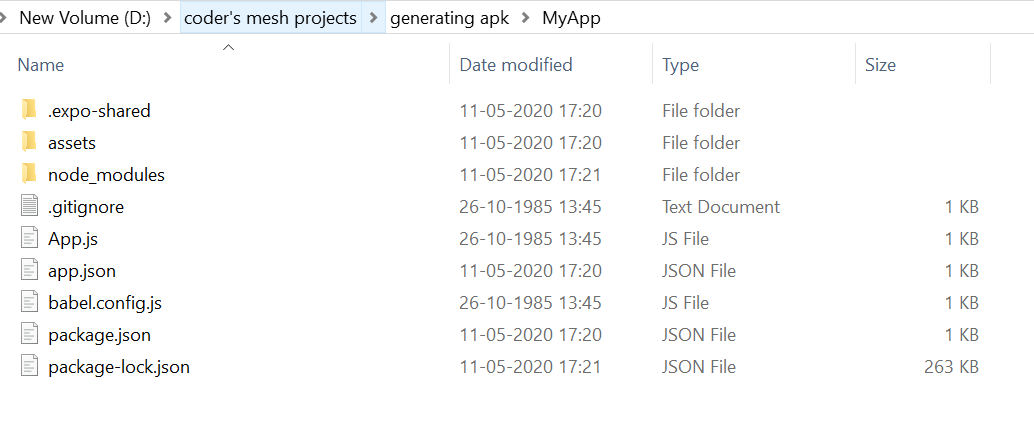 |
| generated folder structure |
I will create my own folder named src in this directory which will contain all of my code. Different developers and industry have different folder structures, I like having an src folder and that will have various other subfolders like screens, components, constants, hooks, api , models, etc. Anyways in this post, we are going to write minimal code just to get our app running as our main focus will be on generating APK out of it. So, we will not require creating most of the subfolders mentioned above, still, it is a good to know about it.
It's time to open your fav code editor and open the project there. In my case, I will choose the VS code editor and will open (Ctrl + O) MyApp folder in that. Create a new folder inside src and name it screens. Inside the screens folder and create your first file and name it MyMainScreen.js. In this file, we will first write the basic boilerplate code as shown below.
 |
| Main screen |
The MyMainScreen will be used as a component and in the app.js file. We will have to import this and use this inside the app component to render it.
 |
| app.js |
Save these files, go to the terminal and run expo start command. This will open your default browser and you will be shown a QR code on the page. The QR code will also get generated on the terminal.
Go to the play store on your phone and download the expo. Install it and run it. Give it the required permission if it prompts for it.
 |
| expo to be downloaded from play store |
Now you will see scan the QR code tab in the home screen you will need to use that.
 |
| Click on the scan QR code |
Now, scan the QR code which is generated in the terminal (or cmd) or from the browser tab opened. Your App will be launched on your phone. By the way, I have added an extra styling in the app.js file and set backgroundColor:"lightblue", Also in the MyMainScreen file I have set the fontWeight:"bold".
 |
| MyApp |
We wish to get the apk of this app which we can share with our friends , family-memebrs etc. Now the actual fun begins. You will have to create an expo account which is very easy. You will just need to go to https://expo.io/signup .Here you will have to fill some details and you account will be set up. Now you can login in with same credentials which you just created. This step is absolute necessity for generating the APK.
Now, go to your the root directory of the project and open the app.json file . We will need to configure it. add the code as shown in the screenshot below to the code in app.json file. Package name can be whatever you want though. But make sure you have the android property in there.
 |
| app.json |
Go back to your terminal (or cmd). Run the app by scanning the QR code as discussed in above section. Open another instance of terminal or cmd and change the directory to the our project folder. In this file run the following command (make sure your app server is running in another terminal).
| command for building APK |
By running this command you will get a prompt and ask for you choice that you want to upload keystore or let expo handle it for you. Just click the option which will allow expo to do it for you.hit enter.
 |
| choose the first one |
You will see in the terminal that the process and began and you build generation in the process.
 |
| Build generation in process |
At this point of time, you can also go to your expo dashboard (you have already created an expo account following the above section). There you could see your app and its status of progress. It would be in a queued status.
 |
| status of the app |
Leave it as it is for some time. It will take around 10-15 minutes generally for the process to complete. It may take longer if it is a working day (sometimes up to 30-40 mins, so be patient). You could also go to https://expo.io/turtle-status to know how many apps are queued to be processed.
Once the process is complete (you will see the completion in the terminal and also the expo dashboard) go back to the expo dashboard.
 |
| status changed to finished |
Click on your app build, in this case, MyApp and this will open the build details page. Scroll down this page and you can find the download icon.
 |
| build details |
Click on this download icon to download the APK file of your app. You will have to choose where you want to download the app. Aha, finally we have the APK which we can share to anyone over google drive links, Bluetooth, pen drive, or any other medium.
 |
| downloading the APK |
You can transfer this app APK to the phone. From the file manager, you will have to install this APK in your phone. Run it , and give permission and also ignore the security warnings for now. You are all set and you have your app running on your phone. 😄
In this post, I have discussed generating an APK of a simple expo-cli project in react-native. You can build complex projects and generate the APK in the same way. You can also customize your app icon and also splash screen image which I haven't talked about in this post. I will try to cover those concepts in some other post, you can certainly look that up in google for now.
In the comment section, please let me know about your views about this post.😃


Good work!!
ReplyDeleteThanks sweta , will try to improve.
Delete